 Last week at Etsy Tea Time I hosted a sort of photo help session. Autumn of Autumn Comfort Candles on Etsy (incredible candle maker!) was so kind as to offer her home for Tea Time! Thanks Autumn!
Etsy shops definitely do better with constantly improving photography... or at least thats what I have found! So this was a great chance for a bunch of us to get together and share some photo knowledge.
It was mid-afternoon on a Thursday during the summer, so there were many cute mini people running around being crazy. In fact, there may have been more little boys under the age of 5 then there were adult women at the house at one point!
Okay, photo pointers that were shared:
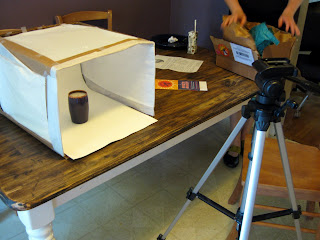
 the awesome and very do-able ghetto light box. gotta luv it.
Take a box, cut out the sides, attach tissue paper. Oh and take a piece of poster board (white - or colored/neutral toned textured papers make great backgrounds) cut a long piece that is as wide as the box and way long. Attach the short end to inside of the box, at the top back corner so that it will be the back as well as the bottom with no crease (this provides the infinite background)
Autumn had one hanging out on top of her fridge (great storage spot!)
 Also very useful: a tripod. Gotta get one. They are great. Keeps the camera steady so you can take macro shots with good focus.
Another hint shared: use the timer, that way the touch of your hand will not shake the camera
Get the tripod down low and level with the item you are focusing on, but stay at least a foot away, if not more. Use your macro setting if you get this close.
 You can take the lightbox and tripod outside for great shots, but indoors use lights. Lots of them. 3 is great (one from each side and one from the top - or one from the back for a neat look).
One option is to use inexpensive metal hoods from the hardware store. These "PhotoFlood" bulbs (available at Sunlan in N. Portland) are amazing for glass, and great in general for amateur photography, they help keep the colors true to the eye.
For hanging a light above you can use a medium size paper ball light fixture (available at Ikea for real cheap)
Personally I plug all my lights into one lightstrip, that way I only have to have all the bright lights on when I am actually shooting pictures. When I am arranging and whatnot I leave the lights off (this also helps with the short life-span of these uber-bright lights)

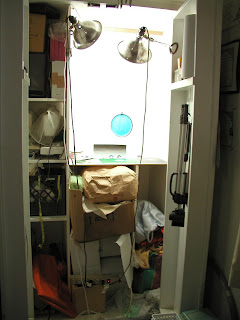
Here is a picture of my closet photo setup. With all the lights on its very bright. But really versatile... I love using a closet, this way I can leave it all set up and simply close the doors and the mess goes away!
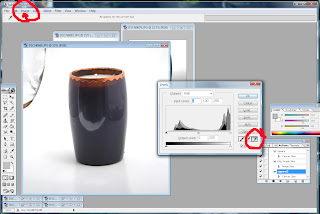
AND THEN we did a little chit chatting about Photoshop. For all those who use Adobe, and perhaps don't really know how, here are a couple of need to know kinda things:
 with a picture open
-for a white background:
go to IMAGE and select Adjustments and LEVELS or CONTROL L
click on the little eye dropper in the far bottom right corner of the LEVELS box, if you hold your cursor there it should say "White"
Now click anywhere on your image, preferably where you would like the whitest of the white background to be - and poof - white background
.

Leah, I love the closet idea. I for sure going to set up the basement bedroom closet this way. A couple of those nifty lights and I am good to go. Thanks for all the help. I learned a lot.
ReplyDeleteOoh, I wish I could have been there--it looks like it was fun!!
ReplyDeleteI also love the closet idea! Then my kitty couldn't disrupt my shoots. :D Not that his cute furry face isn't welcome in a great photograph, but he tends to knock over my backdrops and get cat hair all over them. :P
Now, if only I could find the closet space to use....
Thank you so much for the help!
ReplyDeleteOh, man, I'm sorry I missed it! Sounds like a fun tea time!
ReplyDeletel have that nice photo of my leg tattoo?
ReplyDeletexoxo