 The beauty of the white background in product photography is that you can make the object look like it is floating.
One way to acheive this is to remove the background by hand using the magic wand (Photoshop) or the eraser tool. This is a major PITA and sometimes its the only way to do it.
The good news is that with the right lighting you can acheive this white background without all the Photoshop techniques. Use very bright lights and a white background to achieve true "nothingness" behind and around the object you are photographing.
And the secret tip here... use a lightbox! yep. You know the tracing tool, the handy-dandy lightbox. It makes a great source of light to put underneath your glass art.

Here is what I did:
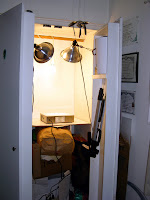
I have my photo setup in a closet
(so I can shut the doors and close it all up, open the doors when I need to take a shot and its all ready for me!) with 4 light sources:
- 2 diagonally facing the focal point (cheap metal hoods from the hardware store)
- 1 directly above the focal point (if glare is a problem you can use a paper ball to cover the light, here you can see mine is just exposed)
- a lightbox underneath the focal point
This technique is great for taking photos of glass! It can really bring out the true colors and translucence. You see all this bright light really makes the glass shine and look fantastic.
 And wow does the piece glow! I swear it looks to me like I erased the background by hand. Thats fantastic. I just had to share. Its all about the lightbox under the bead here in this picture.
Heres another great post about photography:
Amateur Photography
.

No comments:
Post a Comment