Showing posts with label Color. Show all posts

Thursday, May 12, 2011

Love...

I love this picture. Love. Something about the round bump of moss in the round hanging jar. While doing a photo shoot this afternoon I took this shot... I have been making more vessels, for terrariums and such things... simple forms, some don't even have a flat bottom, so they can only hang.
I've been thinking about making mobiles using these hanging vessels... I ordered some nano Marino balls to put in the vessels - I will tell you more about that when they come. Until then, check this mobile out! I put some preserved moss that is bright red in a little jar and made some glass panels and voila - a sweet little mobile! The most enchanting part about this mobile is that it is very interactive... if you touch the jar it spins so easily, and if you blow at the glass discs the whole mobile moves.
This last picture is just a bit more eye candy from taking photos today. I love these jars. Sitting or hanging, they are just the sweetest little things. So simple, so happy, so much potential.

Sunday, February 20, 2011

Dot Mobile

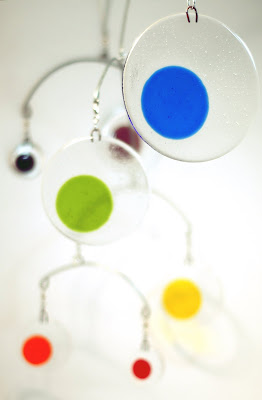
This mobile is a tribute to the beauty of clear glass. The little bubbles that make me happy. The look of liquid frozen in motion. And yet it is a bright colorful mobile. Each clear glass circle is decorated with a colored dot. I melted one color on each disc - the seven discs play in the wind and the colored dots cast shadows. I like it. I like it a lot.
If you'd like to meet this mobile in person (as in hang it in your home/office/garden) it is available in my Etsy shop: click here

Thursday, September 16, 2010

Images from my day...

I thought it'd be fun to just share some images from the last few days... I take a lot of pictures :)
these colorful plates are at Bullseye, I was there lingering while shopping for my new kiln... the colors made me break out the ol' camera while waiting
I love taking pictures of bright colors and interesting textures... flowers... and interesting things...
Earlier in the day I was down at the Lan Su Chinese Garden for tea with a friend
the garden is having a 2 for 1 admission deal for the month of September - check it out!
The lotus flowers in the lake are blooming right now... its a perfect time of year to visit the Chinese Garden
The tea house at the Garden is so amazing. Even the pots they store the tea in are beautiful.
Back at home I washed some pieces... found these pictures on my camera...

this is the mobile hanging in the car I share with Tim - my orange dancer
one picture from this past weekend: this was a tub of pieces I brought with me on Sunday to keep my hands busy... pieces to make a few mobiles...
and here is a picture of my new shop space with both tables assembled - 6 feet square of awesome tables!

Tuesday, May 11, 2010

Glitter

I've got glitter all over the place lately. Nothing like a little glitter crafting to spread sparkles.
Some lady friends of mine came over on Monday and we glittered birdies. Simple little crafty birds (I think the craft store sells these to make wreaths or some kind of strange craft like this.. I just think they look neat covered in glitter and stuck in plants)I also had some fun taking pictures of walnuts that we've covered in glitter. Look at these colorful gems!

Wednesday, October 14, 2009

Hello Fall

Pictures from my day... local apples and pears at the Portland Nursery, and the changing colors of fall at the Japanese Garden. Its a rainbow of fall goodness.


Wednesday, June 3, 2009

Glass Give-Away: Guess How Much the Bucket Weighs and Win a Mini Mobile!

One bucket of scraps of colored glass. In the future these bits will be miniature mobiles. For now It's one full bucket of dirty scraps (although it sorta looks like a bucket of candy to me).

Guess how much the bucket weighs?

Whoever guesses closest will win a free mini mobile! Free from me. Guess in pounds (no need to break it down to grams or ounces, just pounds will do) - leave a comment with your guess - one per person :)

I will announce the winner on June 15th, 2009.

Saturday, January 31, 2009

Playing with Jewels

I spent the day working on some jewelry (earring) designs... oh what fun! I am so excited. I hope to have a new line of earrings to debut at the Portland Saturday Market this season.

Think kinetic mobile meets earrings... mini mini mini mobiles that hang on ear lobes :)

.

Thursday, January 29, 2009

White Background Photography

The beauty of the white background in product photography is that you can make the object look like it is floating.

One way to acheive this is to remove the background by hand using the magic wand (Photoshop) or the eraser tool. This is a major PITA and sometimes its the only way to do it.

The good news is that with the right lighting you can acheive this white background without all the Photoshop techniques. Use very bright lights and a white background to achieve true "nothingness" behind and around the object you are photographing.

And the secret tip here... use a lightbox! yep. You know the tracing tool, the handy-dandy lightbox. It makes a great source of light to put underneath your glass art.


Here is what I did:

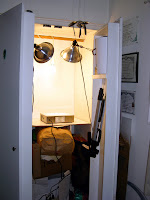
I have my photo setup in a closet
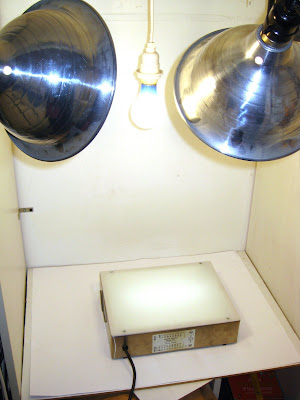
(so I can shut the doors and close it all up, open the doors when I need to take a shot and its all ready for me!) with 4 light sources:


  • 2 diagonally facing the focal point (cheap metal hoods from the hardware store)
  • 1 directly above the focal point (if glare is a problem you can use a paper ball to cover the light, here you can see mine is just exposed)
  • a lightbox underneath the focal point

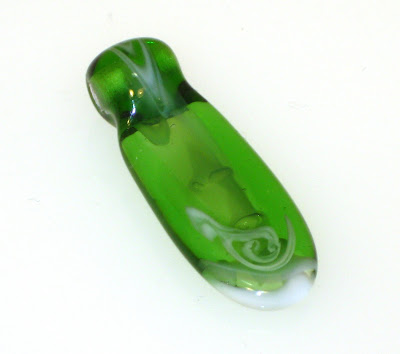
This technique is great for taking photos of glass! It can really bring out the true colors and translucence. You see all this bright light really makes the glass shine and look fantastic.
And wow does the piece glow! I swear it looks to me like I erased the background by hand. Thats fantastic. I just had to share. Its all about the lightbox under the bead here in this picture.

Heres another great post about photography:
Amateur Photography

.

Friday, December 26, 2008

Big Glass Bowls: Birds on a Line

These are two large 17" bowls that I made for my family as Christmas presents. I am currently holding them hostage due to weather snafu.

I thought it'd be nice to blog about something other than snow.

These bowls turned out really nice. I used Brilliant Blue - which is a great color (I can't think of the Bullseye # for this right now) - just cut one sheet in half and cut two big circles, and for each I cut a 17" circle of clear tekta. Then I used some of the scrap marzipan glass from the first "Birds on a Line" big bowl series to make some long wires and birds with my handy dandy torch and some tweezers. I purposefully made one of the wires flex a bit and put a fat bird sitting on it (this is on the bowl that is out of focus in the picture). The other bowl has two birds kissing, and both bowls have one bird flying away.

I love the narrative aspect of this image. Birds on a Line. Birds are funny. We've been watching naturalist David Attenborough, "The Life of Birds" series on Netflicks. Its wonderful.

Wednesday, October 22, 2008

Color Changing Glass


This is very interesting glass.


These two pictures are of the same glass mobile - the glass actually changes color based on the spectrum of light that is hitting it.


I call it chameleon glass, Bullseye Glass calls it "Rhubarb". This name refers to the pink and green tones that the glass shifts between.

The glass looks green when lit by florescent light, pink when lit by incandescent. Sometimes the pieces can look multi-colored. Its really interesting stuff.
I had a little mini mobile like this one hanging in my car for a while - it was incredible, the pieces reflected a lot of different colors. On a beautiful day the bottom edges of the shapes would reflect the blue sky and the horizon, the tops of the pieces would reflect the colors from the road and cars and buildings.

Movement and glass is such an awesome relationship that I attempt to display in my handmade mobiles, and this color of glass really takes things to the next level. I make two small mini mobiles out of scraps of this glass, and larger mobiles to really showcase the color.

Here are some links so you can check them out, if they say they are sold out, look in my shop an you may see I have made more!

Large Champagne Circles
Mini Mobile
Sticky Computer Mobile

The little sticky mobile is a great gift for that geeky loved-one that you never know what to buy for - what makes a better gift than a little bit of handmade goodness!

.

Thursday, October 16, 2008

Name Suggestions Anyone?

This big guy needs a name. Any suggestions?

Tuesday, October 7, 2008

Snowflakes

Okay - here ya go - this is one of the projects I worked on this weekend. (I am making lots and lots of Christmas ornaments lately)

I know, you are thinking - thats a craft punch from the crafty-store! And you are thinking - you can use that with glass?!

Yes. Copper is fusible (it expands at relatively similar rates as the glass) and copper foil is relatively easy to work with. One way you can use it is with crafty punches, making letters and shapes and then sandwich these pieces of copper in between sheets of glass.

You must cover the copper in glass, both front and back... basically the glass must completely encapsulate the copper. The copper will turn colors in the kiln... the cause is the heat in the kiln consuming all the oxygen and when this oxygen depleted air comes in contact with the copper the color changes. As the glass melts and the copper is trapped, it stops changing color, however, before the glass starts moving (which doesn't happen until around 1400F) any copper that is exposed to the air in the kiln will change color. In the picture above you can see how the copper changes. This is a big 17" glass bowl, just clear glass, with a big copper circle for the color. You can see how the edge of the copper turns almost black (this is where the oxygen depleted air changed the color of the copper) and towards the center where the air could not get, the copper stayed copper colored.

Copper is not terribly predictable in glass fusing (as the color changes so easily and inconsistently) and sometimes its much more successful than other times (simply due to inconsistency) but seriously its beautiful and do-able and oh-so-tempting.

So go check out your local crafty-store and see what stamps they have. Then find some copper foil and have a blast. Or just cut the copper foil with an exacto blade - that works well too.

Just remember, you must sandwich the copper in between glass, and don't get your hopes up that the copper will look copper colored in the end. It won't. But it will look cool. Oh and try not to get too many finger prints and wrinkles in the copper, all this will show in the finished fused piece of glass (eek!)

Saturday, June 7, 2008

Collaboration Mobiles

I have been collaborating with another artist friend of mine, Amanda of Bread and Badger. Amanda is an incredible artist and she free-hand etches her designs onto glass. Check out her Etsy store to see more! Shes got a fun blog as well! So... Amanda etched the pieces and I made the mobiles. One is ocean themed and a second mobile is forest themed.

Heres a little video diddy of one dancing.


I really enjoy Amanda's work and it's a great combination, bringing her artwork to life in my mobiles. The first two are now available for sale on Etsy - go check them out!

there is an Ocean Mobile

and a Forest Mobile

Thursday, May 8, 2008

Part II: Making Frit

if you missed Part I of making frit using a coffee grinder - click here

Part II continues with a sample for your viewing pleasure. This plate is a test fire using the frit that I created. I wrote "Rod Scrap" on one side of the glass with Elmers glue and made a smear in the middle of the plate as well, then I applied the frit made from scraps of rod. Then I turned the plate around and repeated this process with the frit made from scrap flat glass writing "broken" with the glue and applying as much as the frit as would stick.

Honestly I was most curious how crappy the multi-colored frit would look after firing due to the sheer amount of plastic that the glass chunks absorbed from the coffee grinder... in the end I think it looks pretty good.
Not rocket science or nuthin... I should have timed how long I pulsed the coffee grinder... you can tell from the pictures that the rod scrap was ground up much longer... regardless it was interesting and pretty darned successful and there ya go - frit from scrap using an old coffee grinder - it works!

Wednesday, April 23, 2008

Making Frit from Scrap

A glass artist is never lacking in scrap bits of glass, and I always tell my students that they can turn their scrap into frit using a coffee grinder! Well, I figured I should try it out and see if it really works!!

Here are the necessary tools: coffee grinder (retired, never use for coffee again!), mask and eye protection

First cut up your scrap (rod or flat glass) into manageable size little chunks that will fit into the coffee grinder politely. Then put it in there, pulse away, and voila!


IMPORTANT: after you grind it up, wait before opening the grinder, and if possible hold the grinder under an exhaust fan when you open it up. There will be a good deal of powdered glass dust created and its important not to breath it in.