Showing posts with label torchworking. Show all posts

Saturday, May 14, 2011

Snaily Snail

The mini glass globe fun continues! I went to the pet store and stocked up on some knowledge, and some aquatic life to put in my tiny glass globes. Snails and plants that can live together, a nice relationship really: the plant causes algae to grow and the snail eats the algae and keeps the glass clean. The snail also eats this particular plant, so it won't starve, rest assured! So hopefully I've created a micro-ecosystem.

Actually I've created 2 micro-ecosystems so far, the one pictured above sits on table like a tiny fish bowl, the other one (in the video below) hangs and is more tear drop shaped. My little experiments. We'll see if the snails survive and make babies! Who knows, someone asked me if they will crawl out of the globes. I have no idea? So I keep checking to make sure they are still in there :)


For sure they are super cute! I find watching them move to be really fun. Go figure. Here is a video for your viewing pleasure - proof these snails are alive (as opposed to glass snails, which I could make, that would be cute as well...)

Friday, May 13, 2011

Sheer Potential

I have been making mobiles of glass jars. The jars are things I have made, blowing the forms using a torch. Each one is just a little bit different. They are simple round shapes with round openings, no flat bottoms. They do not sit on a table - they float! I wrap a bit of steel wire around the lip of the jar and attach a swivel. When you touch one (which how can you help but touch that enticing glass globe and wonder what you can put inside!) it dances in response to your fingers!
You can put anything inside the jars in this mobile - that is why I called this piece "Sheer Potential" - the content is all yours. You could put little words written on paper, love notes and inspiration. Or small feathers or flowers you picked up on a walk. The glass washes out easily, its made of Pyrex glass, so it is not a problem to wash it out (although it is attached to a mobile). Here are some more ideas: plants, snails, moss, feathers, small toys, fake flowers, shells, plastic animals, sparkly things, jewelry, small candles (you could pour wax in there and put little wicks and make them candles!), LED lights, used computer chips, sewing notions, bobbins, buttons... oh my. I'm getting carried away. I had a lot of fun taking pictures of different objects in the jars, today I am going to the pet store in search of a snail to put in a jar :)
I love these shapes and how they hang in the air waiting for interaction. This is a very impressionable mobile! Not only does it move if you blow at the pieces or touch them, it holds whatever you think of putting in the three little jars. Reflection and interaction - a lovely little bit of art to share with the world. Thanks for checking it out :)

New: Hanging Lolipop Vase

Check out these new hanging creations I have been making - now you can buy them in my Etsy shop! (they come with a 3M sticky bit that will hold up this vase just about anywhere indoors)

I make the little glass jars, using a torch I blow the glass. Each one is unique, small subtle eccentricities... but really they are all the same, small simple vases. I think they are just scrumptious! I wrap a bit of steel wire around the lip and attach a swivel so it will dance.
Round little spheres, with round openings... you can put plants in them (they are just the right size for a little starter plant or a small cactus or a lump of moss) or other living things (like a tiny snail in water!), or little trinkets, keepsakes and mementos... a button, a key, a coin, a feather...
Your imagination is the limit! I have them in my Etsy shop now, and I'll bring em' with me to the Portland Saturday Market as well...


Thursday, May 12, 2011

Love...

I love this picture. Love. Something about the round bump of moss in the round hanging jar. While doing a photo shoot this afternoon I took this shot... I have been making more vessels, for terrariums and such things... simple forms, some don't even have a flat bottom, so they can only hang.
I've been thinking about making mobiles using these hanging vessels... I ordered some nano Marino balls to put in the vessels - I will tell you more about that when they come. Until then, check this mobile out! I put some preserved moss that is bright red in a little jar and made some glass panels and voila - a sweet little mobile! The most enchanting part about this mobile is that it is very interactive... if you touch the jar it spins so easily, and if you blow at the glass discs the whole mobile moves.
This last picture is just a bit more eye candy from taking photos today. I love these jars. Sitting or hanging, they are just the sweetest little things. So simple, so happy, so much potential.

Wednesday, March 16, 2011

Walking the Rim

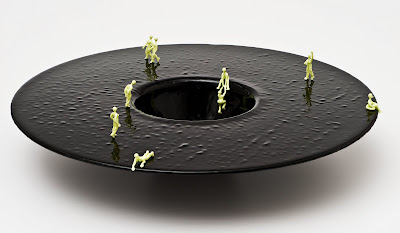
Here are some pictures from a recent collaborative piece - "Little Women" - my studio mate Dennis McConnell made this beautiful glass "saturn" bowl and he asked me to make ladies to attach to the bowl. The bowl is 22" in diameter and the little ladies I made are less than 2" tall.
Some of the ladies are walking around, some are sitting... there is one that is trying to pull another out of the hole in the middle.
They are very simple, these little ladies, but I enjoy the detail in the animation that is achievable. I like to make them doing things, seems to add a human character, a humor value.
There is one lady that is waving to another lady... a couple of ladies are looking over the edge and one lady is sitting on the bottom looking at the lady that is trying to scramble out of the hole...
Thanks Dennis for asking me to collaborate with you!

Saturday, October 30, 2010

BOO!

I made this little ghost a few years ago... dug him up to take a picture because my friend Deb was at the glass studio the other day and asked if I'd ever used glow in the dark powder in my glass creations. Indeed - here is an example. I mixed some of the bright green glow powder in with Borosilicate Kryptonite colored glass (cuz this color already looks like it should glow - I think it makes a great combo) and made these little ghosts. The more powder the better, and you have to mix it into the glass, as it will not stick to the surface really - but if you get enough in there it really glows quite powerfully!

here are a couple links for the powders:

Thursday, September 23, 2010

Stumpsucking Today

Today I am stumpsucking some glass! Okay, yes, that does sound funny. I agree :)

Above is pictured a sad and shocked little tiny frog that I made and tried to encase using a tool called a "Stumpsucker". This little guy was made years ago. Today I am dusting off the ol' tool and trying again! This makes me very excited. I had to blog about it!
Here is another sad sorry attempt at encasement with the stumpsucker. This orange lady looks terrible now and she is covered in bubbles. If the object I am encasing is too cold, bubbles will get trapped. Too hot and she morphs and distorts as the clear glass encases her.
This is what the tool looks like. The black piece of graphite with the hose coming off it is the stumpsucker itself. I attached it to a tripod and put some silver Kevlar stuff around the rubber hose... its a strange and annoying tool. Too small and too awkward to really get the job done. We'll see how it goes today! I'll be sure to take pictures and share afterwards as well.
The inside of the stumpsucker has a plate with holes... so you put your little glass intricate thing in the cavity and get a gather of glass and basically suck that hot clear glass down around your little object. Simple eh? Hard to master.
Previously I have tried to work with borosilicate when playing with my stumpsucker. Today I am trying softglass. Specifically 96coe. Here is a collage picture of my little handful of things that I made up to encase. The beetle turned out stunning (if I say so myself!) and a few things lost some legs... but you know. Its stumpsucking DIY time. The name of the tool is funny and the process is humbling... but I love making little intricate things, putting them into paperweights would be a dream come true.

Years ago when I purchased the tool I tried a few times and got frustrated. Put it in a box and walked away. A few days ago a friend from Aquila mentioned they were wanting to try this and didn't know anyone with this tool - I lit up at the opportunity and made some quick plans to give a whirl this afternoon. Very exciting stuff. I am meeting up with Brandyn down at Elements glass (where he teaches intro to glass blowing classes) to attempt to stumpsuck our little creations.

Tuesday, May 11, 2010

Glass Frogs

Monday I taught a torchworking class at the Aquila Glass School - we made frogs out of borosilicate glass. Such fun in the studio - as always! If you'd like to come join me for a class like this sometime, and curious about what you will make - check it out! We made little frogs that I call "Coqui" because they are small and cute like little Puerto Rican Coqui frogs... Pictured below is a little handful of frogs I brought home to photograph so I could share in my blog what we made:Glass Coqui frogs and frogs on rocks (less fragile - no little feet that can break off) and frogs on pendants (wearable frog sculptures) - last night we also made some lizards on pendants (pictured in the first shot in this blog post)

Thursday, October 15, 2009

Better Portland and Me!


Tomorrow at 1pm on FOX channel 12 here in Portland I will be on TV. Or that is, sometime between 1 and 2pm. I filmed with the crew from Better Portland a few weeks ago... we talked about my business at the Portland Saturday Market and they filmed a little glass torchworking. I made the host Brooke a ring.

The segment will air tomorrow... I'll try and catch some video of it... maybe they'll put it on their website

Thursday, January 29, 2009

White Background Photography

The beauty of the white background in product photography is that you can make the object look like it is floating.

One way to acheive this is to remove the background by hand using the magic wand (Photoshop) or the eraser tool. This is a major PITA and sometimes its the only way to do it.

The good news is that with the right lighting you can acheive this white background without all the Photoshop techniques. Use very bright lights and a white background to achieve true "nothingness" behind and around the object you are photographing.

And the secret tip here... use a lightbox! yep. You know the tracing tool, the handy-dandy lightbox. It makes a great source of light to put underneath your glass art.


Here is what I did:

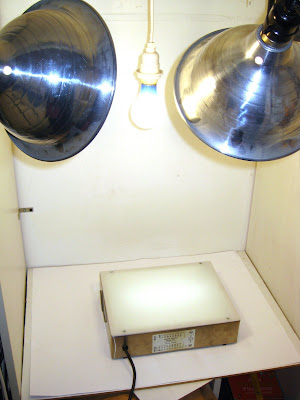
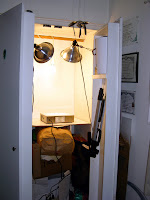
I have my photo setup in a closet
(so I can shut the doors and close it all up, open the doors when I need to take a shot and its all ready for me!) with 4 light sources:


  • 2 diagonally facing the focal point (cheap metal hoods from the hardware store)
  • 1 directly above the focal point (if glare is a problem you can use a paper ball to cover the light, here you can see mine is just exposed)
  • a lightbox underneath the focal point

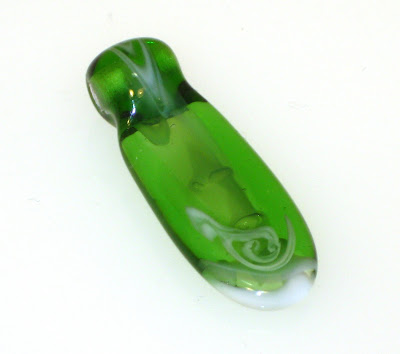
This technique is great for taking photos of glass! It can really bring out the true colors and translucence. You see all this bright light really makes the glass shine and look fantastic.
And wow does the piece glow! I swear it looks to me like I erased the background by hand. Thats fantastic. I just had to share. Its all about the lightbox under the bead here in this picture.

Heres another great post about photography:
Amateur Photography

.

Wednesday, January 21, 2009

The Cousteau Classics

Want to have some fun making beads! Come join me!
I call this series the Cousteau Classics

Each class (call it a fun workshop) is 1 1/2 hours long and costs $99 (this covers all materials and supplies used - all you have to bring is yourself and a good time!). The idea is to have fun making some whimsical aquatic creatures at the Aquila Glass School.
The Cousteau Classics series includes:

Introduction to Working Borosilicate Glass

Tonight I am teaching a class introducing the art of torchworking with borosilicate glass. Its a very fun medium - everything in the picture above was made with boroslicate.

Your imagination is the limit with borosilicate glass. Its very forgiving to work with and here in Portland we happen to live in the midst of the largest boro color producing companies! So there are many beautiful colors to play with. Borosilicate glass is well known for interesting color effects.

This class that I teach (Introduction to Borosilicate) is a great launch pad for any crafty person desiring to get into working with this medium. Knowing how to do a good glass weld is pivotal to most any boro creation - check out this video of James Minson making part of borosilicate chandelier! And working is color is what makes this medium fun!

We cover the basics - 1. Welding Glass and 2. Playing with Color

What we make? A 3-dimensional cube and some pendants
note: we do not make everything in this picture - the image represents a variety of things that could possibly be made in boro - the class is 3 hours long and introductory level :)

You could make a pendant like the one I am giving away this week!

To find out when this class is offered (if you aren't joining me tonight!) check out the schedule on the Aquila Glass School website

Monday, January 19, 2009

Give-Away: FREE Pendant

Who wants a free pendant!! Post a comment on this entry and get a chance to win this little beauty!

Its green and white and clear borosilicate glass - its about the size of a quarter. The lines of color swirl gracefully around this little pendant made by yours truely (ME!).

This week I am having a Torchworking Week - what does that mean? It means I am making a concerted effort to get behind the torch as much as possible and all my blog posts will be oriented around glass torchworking. Did you notice I even changed my banner in honor of this week? :)

So enjoy! heres a sneak preview of some of what I will be blogging about this week:
  • how torchworkers can personalize handmade candles
  • Wednesday I am teaching a class introducing Torchworking Borosilicate
  • next week my Cousteau Classics Beadmaking series is starting, so I will blog about that
  • and there will be a couple whimsicle surprises as well
stay tuned - especially you torchworking friends of mine - I hope this week will be full of fun reads!

and hey - this pendant could be yours! Winner will be chosen Jan 26th 2009

Sunday, January 18, 2009

Yoga

I have been working on my yoga again lately.

Both in the glass studio and on my body.

My brother now has the WE Fit and we've all been having fun with it and getting in shape (its nothing new to me to learn that my body mass index is a little disappointing).

The WE is fun, I like how it makes you very aware of where your center of balance is. This is very key to yoga.

Since I have more free time lately (for instance today I got to work in the studio rather than sitting outside at my booth at the Portland Saturday Market! whoopee! The PSM is closed during Jan and Feb) - its been easier for me to do more yoga in the mornings.

Last week I did yoga 3 times. This is huge for me. It feels so good for my body to get back into it. This morning I kicked my own ass with a "Strength" yoga routine by Rodney Yee that had me doing push-ups and downward dogs for 25 minutes. phew. My shoulders will be sore tomorrow! But it was great.

Balance is key to life, both emotionally and physically. Without yoga I feel more moody and my body starts to have more and more aches and pains. Its amazing that some mindful stretching and relaxation can be so pivotal in balancing my nerves and helping me keep grounded. I couldn't live without it. Even though I slack occasionally, yoga will always be a part of my life. That is a conscious choice that I make.

Friday, December 26, 2008

Big Glass Bowls: Birds on a Line

These are two large 17" bowls that I made for my family as Christmas presents. I am currently holding them hostage due to weather snafu.

I thought it'd be nice to blog about something other than snow.

These bowls turned out really nice. I used Brilliant Blue - which is a great color (I can't think of the Bullseye # for this right now) - just cut one sheet in half and cut two big circles, and for each I cut a 17" circle of clear tekta. Then I used some of the scrap marzipan glass from the first "Birds on a Line" big bowl series to make some long wires and birds with my handy dandy torch and some tweezers. I purposefully made one of the wires flex a bit and put a fat bird sitting on it (this is on the bowl that is out of focus in the picture). The other bowl has two birds kissing, and both bowls have one bird flying away.

I love the narrative aspect of this image. Birds on a Line. Birds are funny. We've been watching naturalist David Attenborough, "The Life of Birds" series on Netflicks. Its wonderful.

Sunday, November 9, 2008

Fun Soggy Weekend

This weekend the weather here in Portland was rainy and gray, temperature in the 50s and sorta windy. And I was outside selling my artwork! Sheesh I am crazy :)

I actually had a fun weekend in spite of the forecast calling for constant rain and wind. After being depressed all week about the onslaught of this persistent crappy weather, I don't really know why I decided to vend this weekend. Saturday morning I showed up skeptical of my strange choice, dressed in my navy blue rain jacket, my rain boots , two layers of fleece sweaters and two pairs of long johns.

To make a long story a little bit shorter, I ended up switching booths with my neighbor Bob. That small change made my whole weekend so much more fun and exciting! I set up my booth in his spot (2 spots down the road from my reserved space) and he set up in mine. Bob makes incredible metal birds, lifesize and gorgeous, his business is Metal Art by Swan.

Residing in Bob's spot for the weekend was great! I think I really needed a little change of pace to brighten my weekend, and this was perfect. I absolutely love all my neighbors in my reserved space, they are awesome, don't get me wrong. It was just fun to be in a different location for a weekend... even though it was just two booths down :)

I got to hang with my friend Maggie, Papaver Jewelry, she is in the picture above, don't our booths look great even though the weather is sh*t and already getting dark! Oh I forgot to put my big red Leah Glass sign... when I remembered I just didn't bother cuz I figured it'd just get wet and I didn't feel like toweling it off.

And I got to meet many customers that were so friendly and kind. It was not the busiest of weekends, but in my new perspective I was basically right at the entrance to the market, and there weren't a whole lot of vendors, so I was very visible and colorful. People were walking down the road saying to their friends/family "Oh I like those mobiles, I have seen them online!" and man, that just makes me so darned proud - I can't even tell ya! And the fact that many mobiles and other creations of mine went home with new owners, that makes my day even sweeter!

Today I made a lot of rings (I thought that would be a good way of utilizing the rainy day and possibly rousing up a little business from people enjoying watching the process - it worked too!), so I thought I'd share a little video diddy of me demoing making rings.


If you are also curious about my ring making process, here is a tutorial I made years ago - it shows exactly how these are made. Just excuse the old website format... makes me think I should re-do this tutorial... that website it is on is an old template of mine that takes forever to load all the seperate pictures...

sheesh. :)

Saturday, November 1, 2008

Glass Give-Away: Cutey Drop


I found this little blue droplet and I thought I'd share. He makes me smile and he deserves a good home!

He has a cutsey little "O" expression and a jump-ring thru the little hole on the top of his head.

I made these years ago... in all different colors and different facial expressions. I have a jacket somewhere that I attached a yellow one to the zipper... and a few change purses that these got attached to as well. I even made a few mobiles that every droplet had a different facial expression, like little characters - I loved these mobiles!!! Occasionally their owners will visit me at the Portland Saturday Market and tell me that they own a mobile made by me that have little faces on the drops - and I squeal and smile with the memories and inform them that they own a collectors item :)

Well I found this little blue one and I thought I'd share. He has a cutsey little "O" expression and a jump-ring thru the little hole on the top of his head.

He could be yours! Simply leave a comment (and spread the word to friends and family of the FREE opportunity on my blog here - ANYONE can win!) and make sure that I can contact you if you win (leave your email in the comment if you don't have a blog or if your blog profile is private)

These give-aways are the real deal - HERE you can see who all has won and received previous FREE give-aways. The point of these promotions is to drive more traffic to my blog and give away clutter from my studio.

This giveaway will run from 11/1/08 thru 11/15/08 - Good Luck!

Sunday, October 26, 2008

Halloween Glass Murini Cane

This Wednesday I am doing some live torchworking at my local elementary school where my friend runs the Sun program. Its family night and the gym is always crazy with pumpkin paint and pizza. I am torchworking outside, I've done this for 4 or 5 years now, making little halloween trinkets for the kids while they watch and the parents can buy them as a fund raiser for the school library.

Kids cannot resist a flame, and they are intrigued by glass. I must admit, I agree with them!
So every year I try and do something different (especially since the kids remind me each year of what silly thing I made the year before, and they come back expecting something new to add to their collection, happily listing to me what they already have). And may I add, I have to make something fast and efficient and not tooo boring (is it possible for glass to be boring? yes). Because the kids line up, snake-tailing around and waiting not-so-patiently for their turn to buy a little thing that I have made. Yes seriously folks, its kinda crazy. I've tried bringing things I've made in advance (one year I did orange and black beads - soft glass beads so they had to be annealed - and then I strung them on a headpin and put each one on a key chain for the kids - I didn't want them to swallow the beads! - and I did all this in advance so the kids could simply buy them, no waiting around in line for me to make one for each kid) and honestly they were confused and not so pleased that I would not allow them to buy the beads I was making as demonstrations.

So its gotta be borosilicate, its gotta be small (the littlest kids are not appropriate to buy the creations, I don't want them to eat them) its gotta be simple, fast and efficient - and its gotta be all about Halloween.

I did little pumpkins one year, and the next year glow in the dark ghost pendants, then little mushroom pendants (I figured the autumn type theme kinda seemed Halloween oriented - hey I was running out of ideas!), and last year little orange and black beads.


This year I thought I'd make a couple of simple murini canes, so I can make the kids little marbles and simply pick up a little murini disc on the end of a clear gather. This process is super fast and pretty effective. Good for short attention spans and early bed times (family night for Halloween night - kids gotta get home and go to bed). Its impressive the way a tiny disc of color on the side of the glass looks like a pumpkin face when viewed through the marble - the optical effect is like a magnifying lens.

So the murinis I had in mind were a pumpkin face and a bat.

In these pictures you can see the canes that I made - they are not too spectacular but they get the point across. A recognizable pumpkin face (although he has a Snoopy nose and a weird smile) and a bat (the bat is pretty ghetto, but hey, it ended up looking like a bat!) the white bits you see in the picture are bubblesThe idea of a murini cane is that the image you see at the end of the rod continues down the length of the cane. You cut up the can into little discs and then each disc has the image on it. A flower murini would be called "Millifiori", Italian for "millions of flowers" as each can could be cut up into millions of little flowers.
So on Wednesday I will make marbles for the kids at Shaver Elementary. They will get to choose between bats and pumpkins. I'll bet the boys go for the bats. I don't know whether they will be pleased with my little creations, I just hope they don't eat them or stick them up their noses!

You know the best part of this: the kids are all in costume - so I get to see all the little ones in their outfits, its quite cute. Makes me squeal occasionally.

.

Tuesday, October 21, 2008

Playing with Fire

Class last night was a good time! I taught some fused glass artists to play with fire, we made glass embellishments for their fused glass pieces!


The Aquila Glass School has a blog now, I blogged about the class last night.


The Aquila blog will be a way for me (as well as Don and Scott) to post pictures about all the current goings-on at the glass studio. Its a fun quirky place, there is always something going on, now the trick will be getting everyone to take pictures all the time.